
The Definitive Guide to Wrapping Gifts
Tricks and Tips for Wrapping Gifts
Once you find the right gift for that someone special, you will likely want to make it look enticing and beautiful. Whether its for a birthday or Christmas morning, this guide for wrapping will be sure to make your gifts look amazing.
Why You Need This Skill
As Real Simple says "Once you know how to wrap a present, you'll know forever. You can pull out your gift-wrapping knowledge for all occasions to come. You can face last-minute gifts with the confidence that you can give them a good presentation in minutes." (And if you're still having trouble, read up on their gift-wrapping mistakes to avoid.)
Gather your materials:
- Wrapping paper
- Scissors
- Tape
Step 1: Secure fragile items within boxes. Make sure breakable items are wrapped securely and won't move around. (We recommend using tissue paper as padding.) Tip: Use a small piece of tape to keep the box closed.
Step 2: Measure the right amount of wrapping paper. Spread out your wrapping paper. Place the box in the center of the unfurled paper, upside down, so the seams of the paper will end up on the bottom of the package. Bring the paper up one side and over the top of the box, all the way to the opposite edge. Estimate how much additional wrapping paper you'll need to cover the side of the box that's not yet covered, then cut the paper. Strive for long, even cuts. If your edge is jagged, fold it under for a smooth seam.
Step 3: Secure the paper to the box with tape. Center the box on the paper. Bring one side of the paper up and halfway across the top, affixing it to the box with a piece of tape. (With some practice, you may be able to skip this step.
Step 4: Fold the other side for a cleaner edge. Before bringing the second side of paper up and over the first, create a clean seam by folding over the last half-inch of the paper, using your fingers to create a tight crease. Now bring this side up, so it just overlaps the first one and affix with tape. Tip: Use double-sided tape for a cleaner look.
Step 5: Fold the paper on each side of the present. Starting on one end, fold down the top flap onto the side of the box, creating two little wings at the side. Flatten those in against the box, then fold the remaining triangle of paper up against the box. Fasten it in place with tape.
Step 6: Stand the box up and repeat folding to the other side. Set your box on end, with the side you just worked on facing down, and repeat step 6 on the opposite end.
Step 7. Add finishing touches. Add any ribbon, gift tags, or decorative bows to your gift. For gift-wrap extra credit, learn how to make curling ribbon bows. Tada: You've just wrapped a present perfectly.

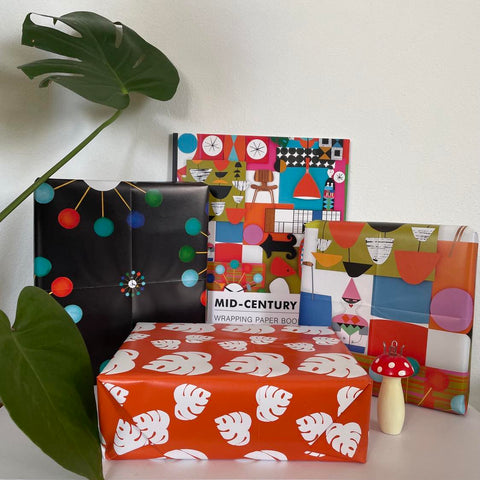
Our new Wrapping Paper Books are a fun, convenient and easy way to keep wrapping paper accessible all year around on your shelf or coffee table. Enclosed in between the soft matte finish covers are generously sized sheets of full color wrapping paper. These sheets are the perfect size for small gifts like candles, soap, jewelry and mid-size things like wine or favorite teNeues illustrated book :)
-
12 Sheets of folded full color paper sheets for gift wrapping
-
2 each, 6 images or colors
-
Measures 26 x 19.6" open, 13 x 9.8" folded
-
Each sheet perforated for easy removal from binding
-
1 sheet of adhesive to/from labels included


Our collection of expertly printed wrapping papers uses art from the best artists, past and present, in a big format paperback book. Your gifts will be sure to stand out from the rest with our high quality wrapping paper!
Shop our wrapping paper book collection now.
Source: https://www.realsimple.com/holidays-entertaining/gifts/wrap-present